

Take your agent live
Take your project live
So far, your agent runs on your computer. Taking it live puts it online on the Dashboard's managed hosting, so it's available around the clock, at an address your website's chat can talk to, without your laptop. Your coding agent does the work with the prompt below; you sign in, approve access, and check the result.
- How to put your agent online for customers, without running servers or keeping your laptop on
- How your coding agent does the whole deployment, leaving you only a few approvals
- How every change you push afterwards goes live on its own
Let your coding agent take your agent live with you. Copy the prompt and paste it into your coding agent, in the project folder you've been working on.
Each step below starts with what happens in it. Your coding agent runs the commands and tells you when it needs you; the commands themselves are under Doing this yourself? if you're following along without it. If you'd rather click through it in the Dashboard, see Deploy from the Dashboard.
Requirements
- The project you built and tested in Install & run.
- A GitHub account. The Dashboard deploys your agent from a GitHub repository, which can be private.
- A Dashboard workspace on the Basic plan or higher, with a free slot for a live project. See pricing.
Your live agent gets its own Dashboard project. The Local development project you've been testing with stays as it is, so you can keep experimenting there.
Prepare your project
Your coding agent checks that the project will run on a fresh machine, not just on your computer, and that keys and local data stay out of it.
If you started from the example, its orders are sample data. Hosting it puts the demo online; it doesn't connect a real store. Your coding agent keeps it labeled as a demo, and tells you what would need to change before real customers use it.
Doing this yourself?
Check that:
- A fresh checkout can install the declared dependencies and start the project's entry point. A path such as
../parlant-proworks on your computer but won't exist on the hosted machine. .env, model keys, Dashboard tokens, andparlant-data/are ignored by Git.- Hot reload is off in production.
- The model provider your code uses has its package in the project's dependencies.
Check that the installed Parlant has the commands this page uses:
parlant dashboard project create --help
parlant dashboard deploy --help
If they're missing, update Parlant before you continue.
Put it on GitHub
The Dashboard deploys your agent from GitHub. Your coding agent asks which account or organization to use and whether the repository should be private, then commits the project and pushes it. Your keys and local data stay on your computer.
Doing this yourself?
Create a repository, for example dashboard-agent-example, then commit the project and push the branch you want to deploy. GitHub's repository guide walks you through it. Never upload .env, model keys, Dashboard tokens, or parlant-data/.
Sign in to the Dashboard
Your coding agent signs the Parlant CLI in to your Dashboard workspace. A page opens in your browser: sign in, or create an account, then approve the request for the workspace where the agent should live.
Being signed in to the Dashboard in your browser doesn't sign in the CLI, so you approve this once even if you're already signed in.
Doing this yourself?
parlant dashboard auth login
parlant dashboard auth status
parlant dashboard workspace list
If the browser doesn't open, use the complete verification link the CLI prints, including its code. If the request expires, start a new login. If the CLI is signed in but can't create projects, run parlant dashboard auth login --reauthorize and approve the updated request.
Connect GitHub and create the project
Your coding agent creates the live project and gives you a link to connect GitHub. On GitHub, you authorize the connection and give the Parlant GitHub App access to your repository. If the repository belongs to an organization, its owner may need to approve. Then you and your coding agent choose the repository and the branch to deploy.
Signing in to GitHub isn't the same as giving the App access to a repository. If yours doesn't show up, add it to the App's repository list on GitHub; don't make a private repository public to fix it.
Doing this yourself?
parlant dashboard project create --name "Homeware Production" --kind managed
If GitHub isn't connected, the CLI offers Connect GitHub and opens its authorization link. Complete it, install or configure the GitHub App on the account or organization that owns the repository, and grant access to your repository. GitHub explains installing an App.
Return to the CLI and press Enter. It reloads the repositories and offers the branches. If the App is already installed but your new repository is missing, open the owner's Settings → GitHub Apps, add the repository to the App's selection, and save.
Review the settings and add your key
Once the project exists, the Dashboard looks at your repository and suggests how to build and start it. Your coding agent checks the suggestions against your code, then adds your model provider's key as a secret, which stays hidden and is never shown again. It shows you the settings before saving them.
Don't paste keys into your chat with the coding agent. It can read them from your local .env without printing them.
Doing this yourself?
For a uv project that uses Gemini, with GEMINI_API_KEY and PARLANT_GUEST_TOKEN_SECRET set in your local environment:
parlant dashboard project create \
  --name "Homeware Production" \
  --kind managed \
  --repo YOUR_ACCOUNT/dashboard-agent-example \
  --branch main \
  --build-command "uv sync --frozen --no-dev" \
  --run-command "python main.py" \
  --run-env PARLANT_ENV=production \
  --secret GEMINI_API_KEY=GEMINI_API_KEY \
  --secret PARLANT_GUEST_TOKEN_SECRET=PARLANT_GUEST_TOKEN_SECRET
The text after = in --secret is the name of a local environment variable, not the secret itself. Use your own provider's key name. The guest-token secret keeps anonymous visitors' conversations working across restarts; generate it once and keep it stable.
Don't copy the project token from your Local development project's .env; the live project has its own.
To change a secret later, pipe it in so it stays out of your shell history: printf %s "$SECRET" | parlant dashboard secret set KEY. secret list shows names only. A changed secret takes effect on the next deploy.
Deploy
Your coding agent starts the deployment and watches it build and start, which takes a few minutes. A finished build isn't the finish line: it waits until the server is up and your agent is available.
Doing this yourself?
parlant dashboard --project PROJECT_ID deploy
parlant dashboard --project PROJECT_ID project describe
parlant dashboard --project PROJECT_ID agent list
deploy builds the latest commit on the configured branch, with the settings and secrets saved at that moment, and follows it until it's live. If a deployment is already running, it tells you instead of starting another.
Test the live agent
Open your new project in the Dashboard, and on its Overview page, click New session. This conversation runs on the hosted server, not your computer.
If you started with your own agent, try a conversation from your own use case. For the example, send:
Where is my order 1234?
Then ask:
Can I get the tracking number?
You should get the same answers as on your computer: the ceramic table lamp arrives Thursday, with UPS tracking number 1Z999AA10123456784. If you kept the express shipping policy, Where is my order 5678? should get the $9.99 upgrade offer.
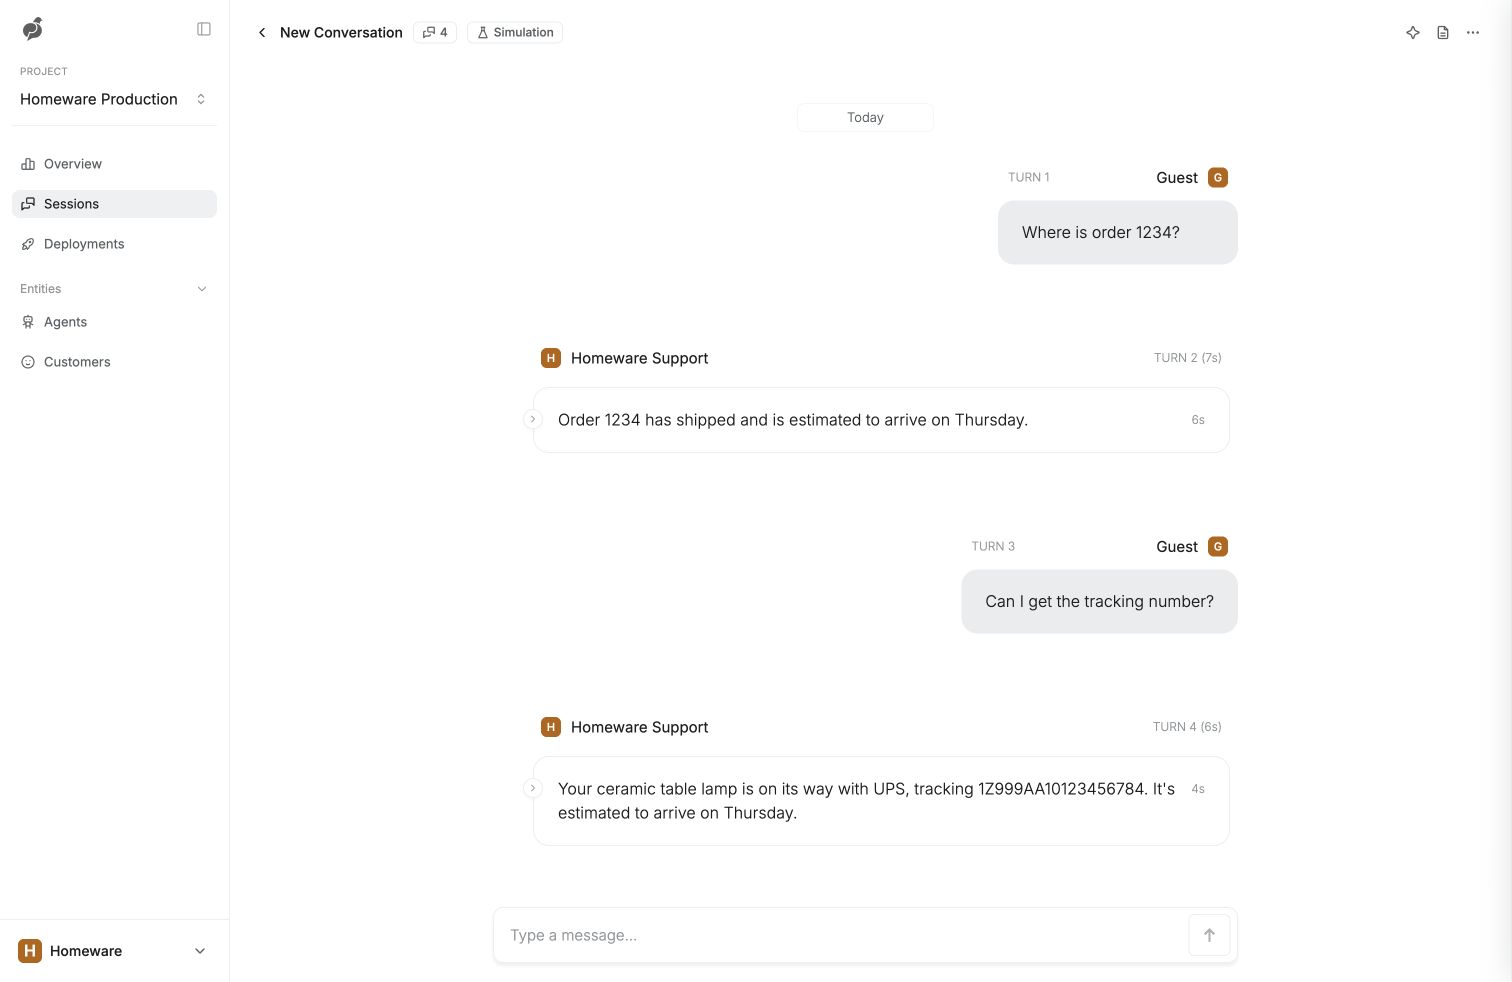
This conversation runs on the hosted server. Your laptop no longer needs to run the agent.
From now on, every push to the branch deploys automatically. After a change goes live, test it the same way.
If something goes wrong
Tell your coding agent what you see, and ask it to find and fix the cause before trying again. In the Dashboard, a failed deployment has a Copy fix prompt button that gives your coding agent the details.
What your coding agent checks
- Project creation was interrupted: resume with the
--request-idthe CLI printed and the same settings, rather than creating a second project. - The repository or branch is missing: check the GitHub App's repository access, the repository owner, organization approval, and that the branch was pushed.
- The repository check fails: the project still exists. Resume with
project create --request-id REQUEST_ID --kind managedand explicit settings, and don't deploy until they're right. - The build fails:
deployment list, thendeployment logs ATTEMPT_ID --channel build. Look for missing dependencies and paths to files on your computer. - The server doesn't come up:
deployment logs ATTEMPT_ID --channel runtimeandproject describe. Check the start command and the secrets. - The CLI stops waiting: that doesn't cancel the deployment. Check the same attempt with
deployment view ATTEMPT_IDinstead of starting another. - The CLI says a quota is used up: it names the quota and when it resets. Wait, or check the deployment in the Dashboard.
Deploy from the Dashboard
You can do the same steps by clicking through the Dashboard. First, do the preparation and GitHub steps above, with your coding agent or yourself.
The screenshots show the example in a workspace named Homeware, with a live project named Homeware Production. The agent inside is still called Homeware Support; a project's name doesn't rename the agent.
1. Create the project
Open the Dashboard and choose your workspace. In the project selector, choose Create project, enter a name, select Managed, and continue.
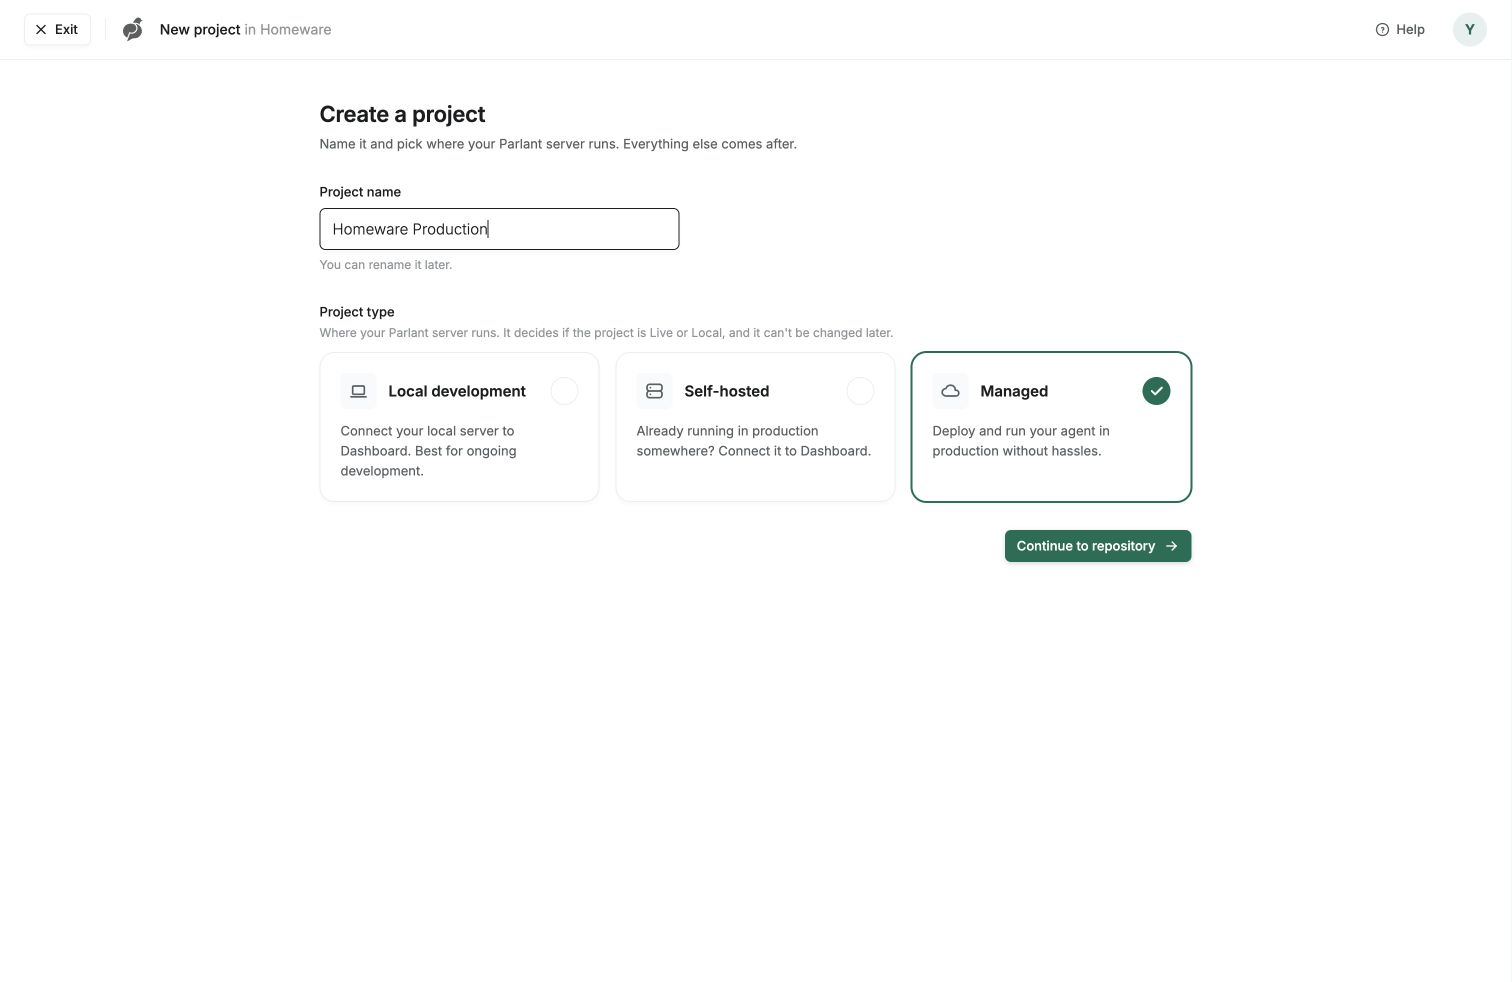
Managed runs your agent on hosted infrastructure. Your Local development project stays separate.
2. Connect GitHub
If this is your first time, choose Connect GitHub and follow the window it opens. Install the GitHub App on the account or organization that owns your repository. If GitHub is already connected but your repository is missing, choose Manage access, pick Only select repositories, and add yours without removing the others.
3. Choose the repository and branch
Search for your repository, select it, choose the branch you pushed, and click Create project.
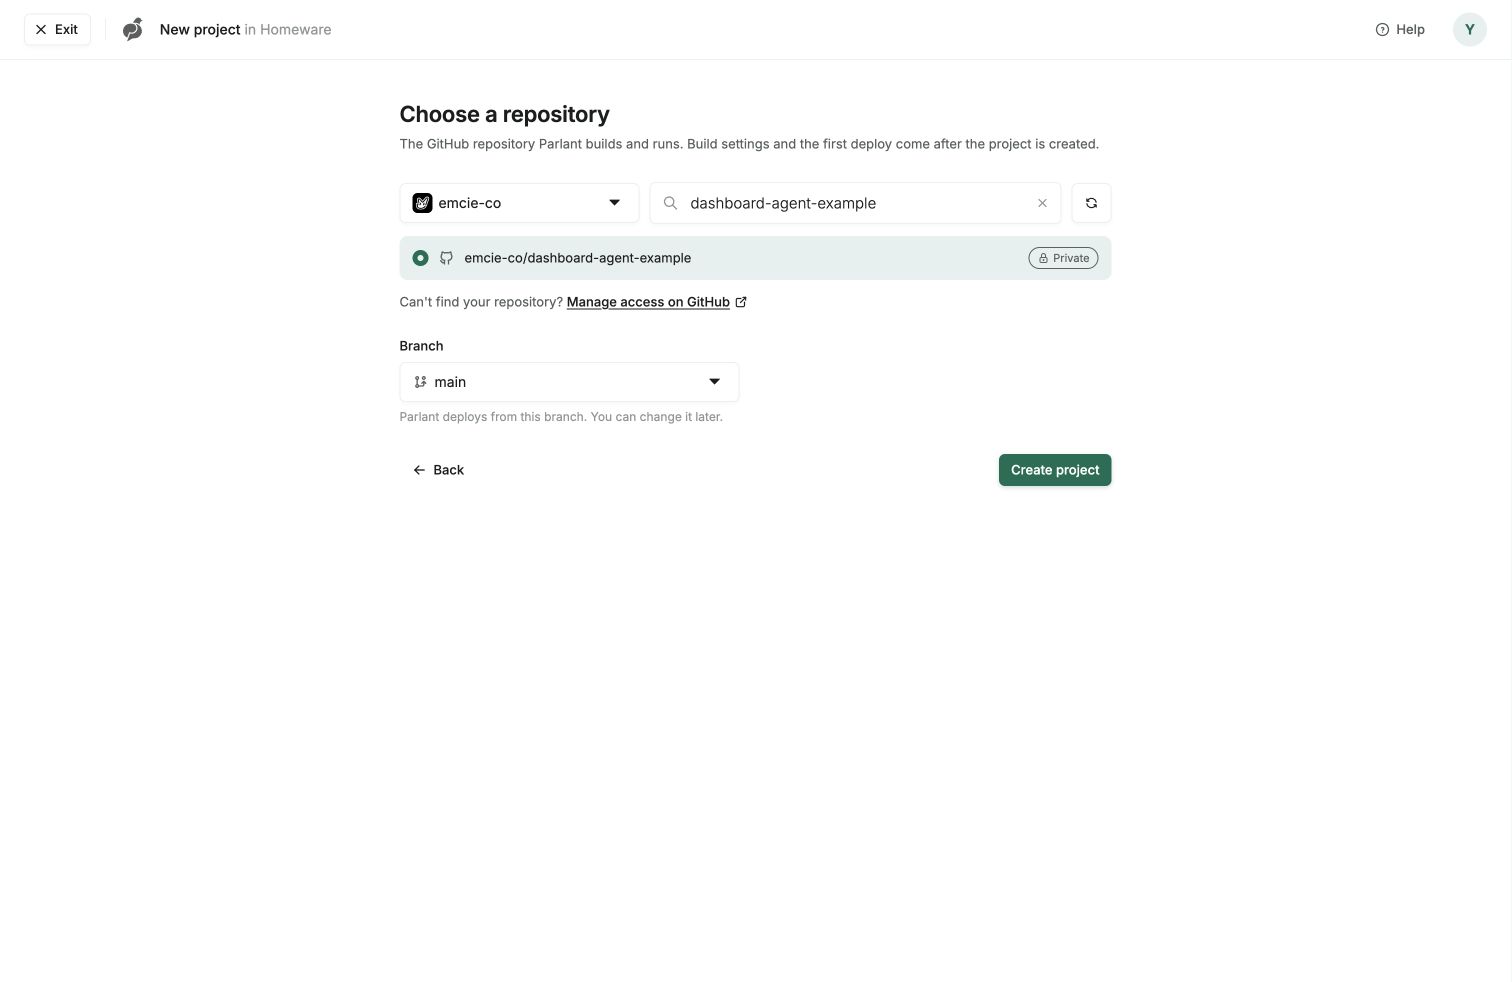
The repository supplies the code, and the branch decides what gets deployed.
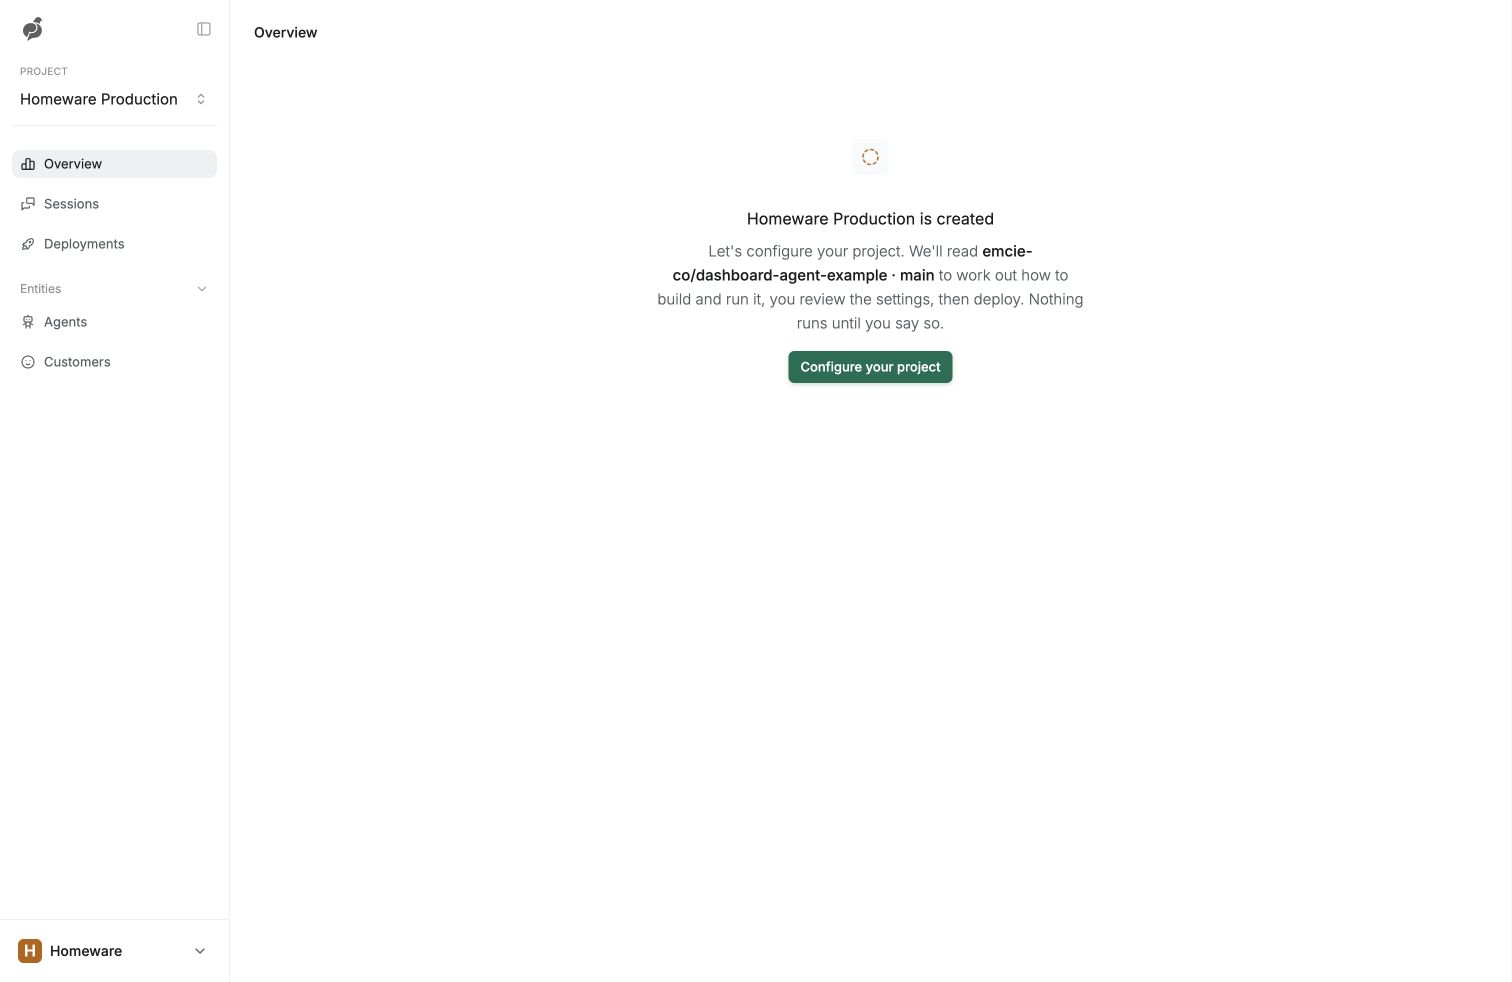
The project exists, but nothing is deployed yet. Choose Configure your project.
4. Review the settings
The Dashboard suggests how to build and start your project. If something looks wrong, ask your coding agent to check the repository and tell you the right value.
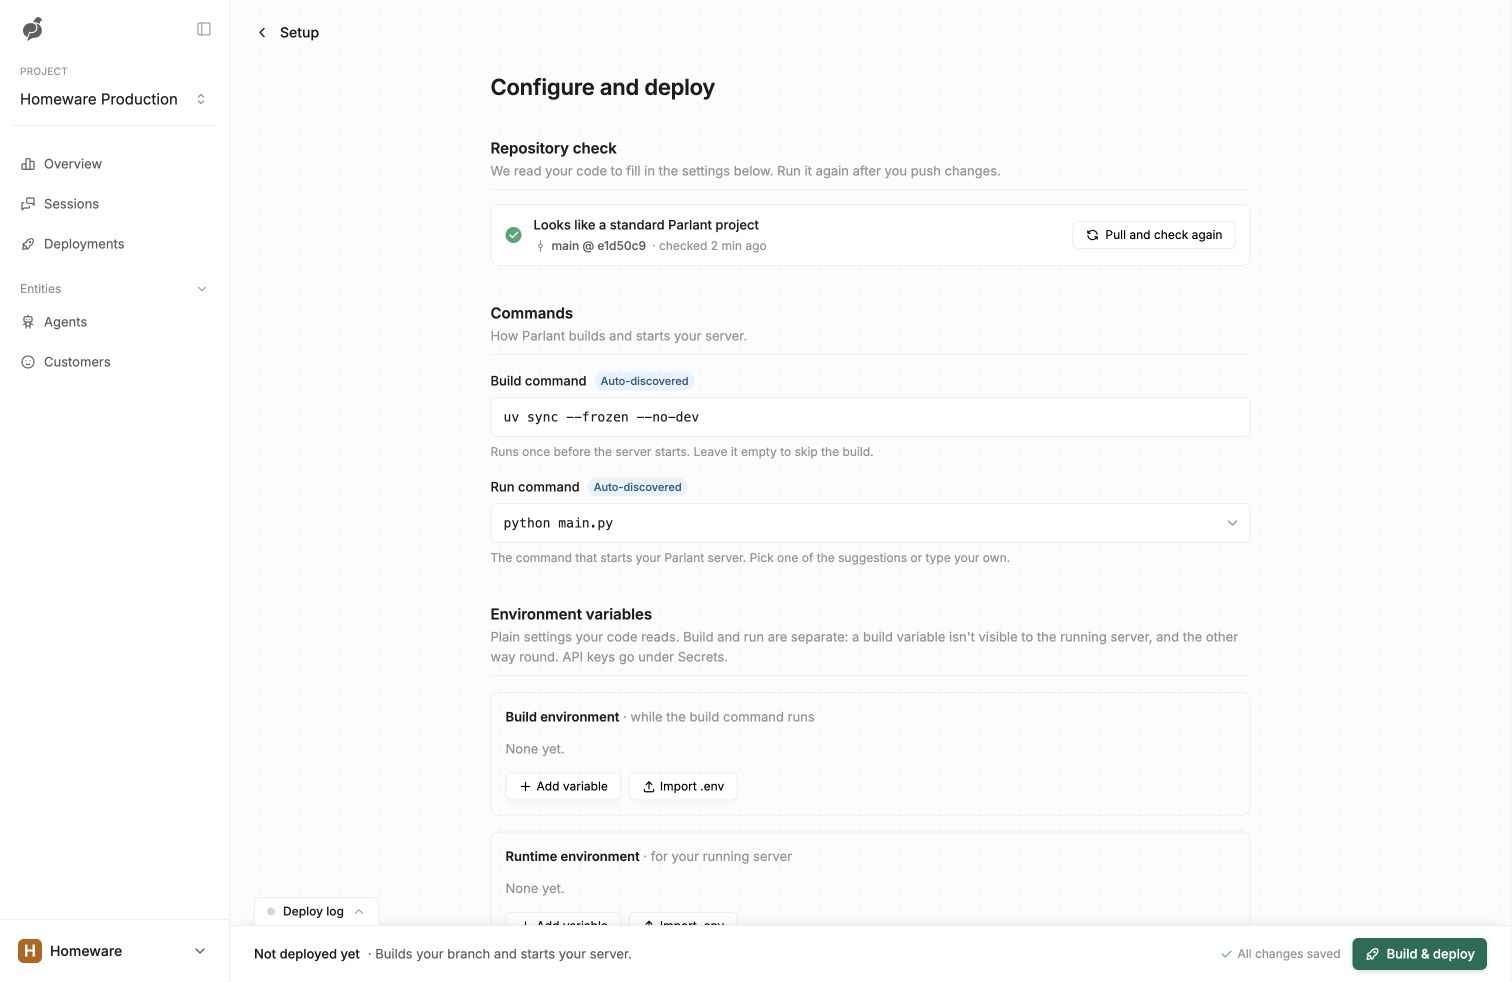
For this example, uv sync --frozen --no-dev installs what it needs, and python main.py starts it.
Put your model provider's key and other credentials under Secrets, not ordinary variables. For the example, that's GEMINI_API_KEY and a stable PARLANT_GUEST_TOKEN_SECRET.
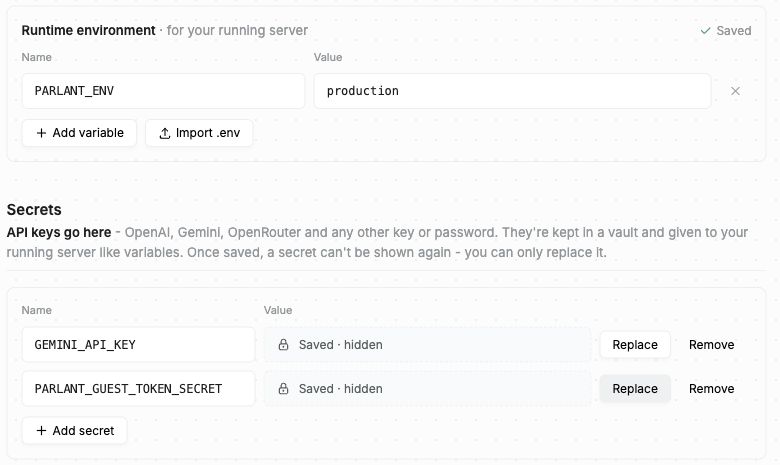
Saved secrets are hidden. Check that the settings show as saved before you deploy.
5. Build and deploy
Click Build & deploy, and keep the log open until the deployment completes.
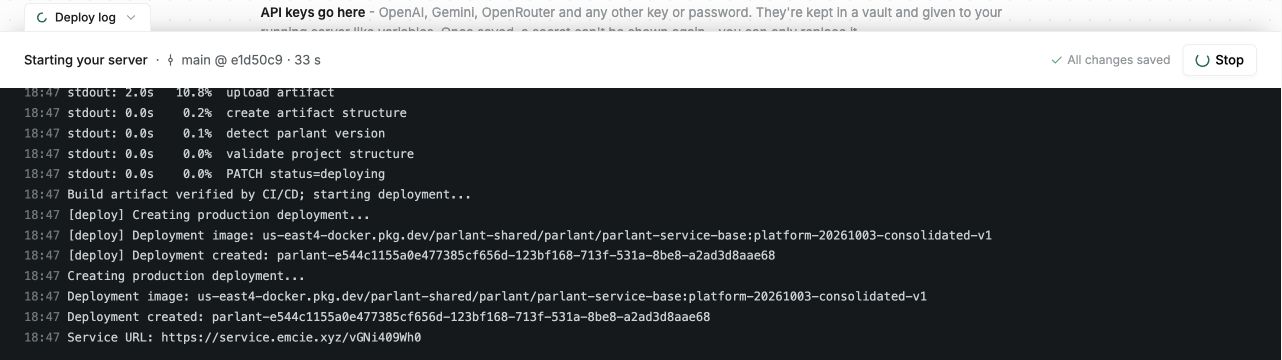
The log shows what the deployment is doing. If it fails, fix the cause before retrying, rather than creating another project.
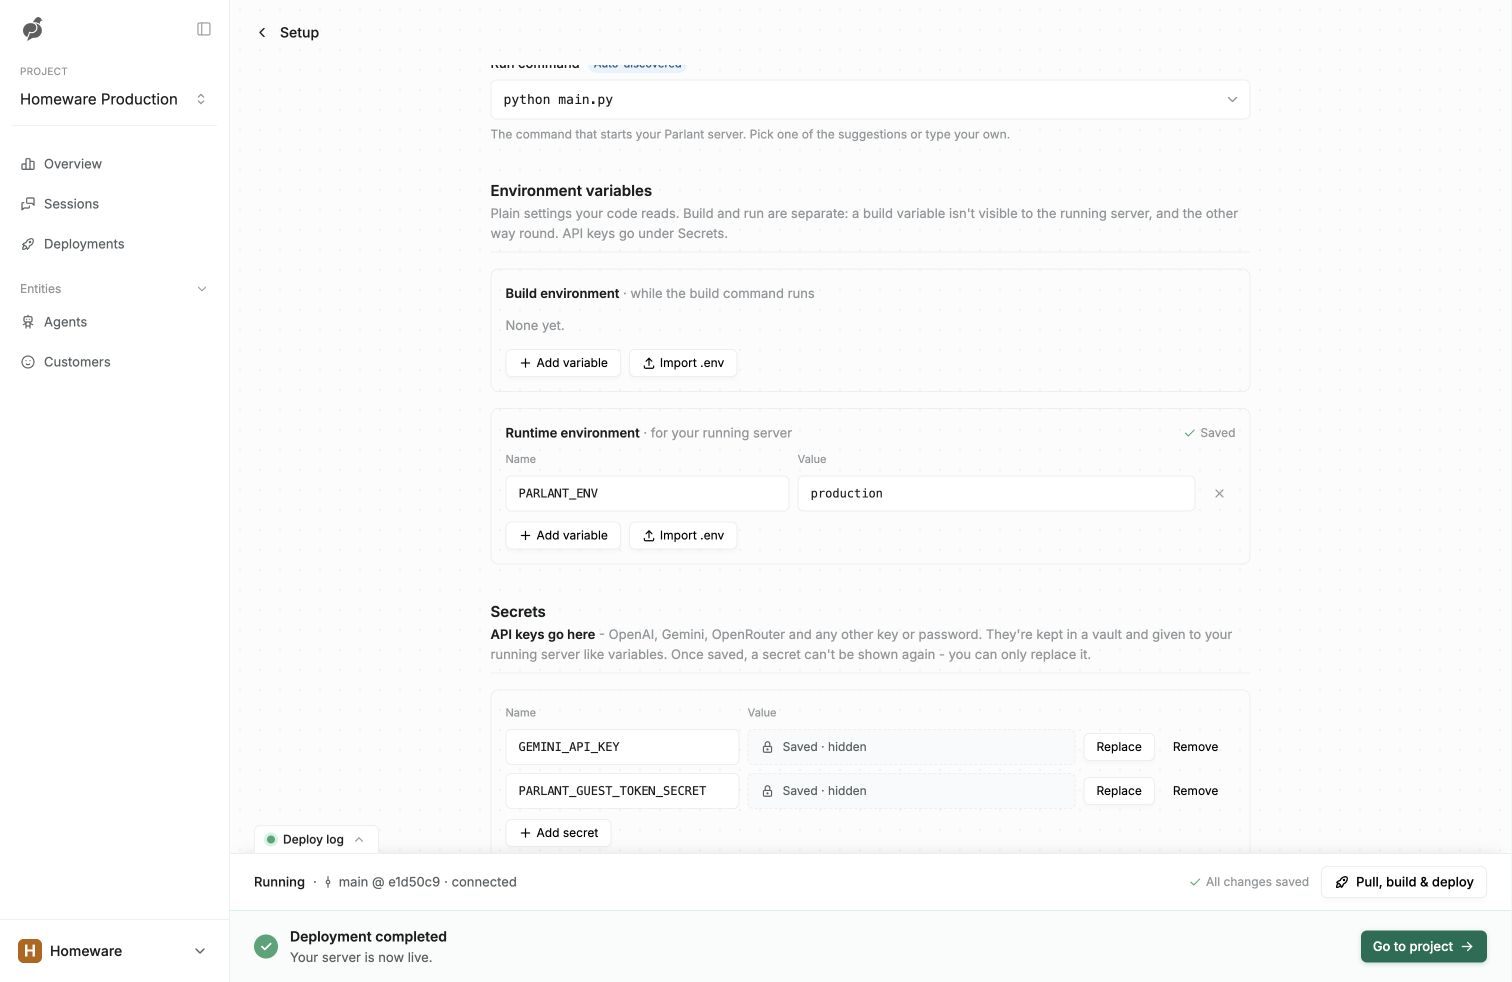
Deployment completed means your agent is live. Choose Go to project, then test it.
If a deployment fails, use Copy fix prompt to give your coding agent the details. It fixes the cause and pushes the change, and you retry from the same project.
Next steps
Integrate it into your app or site: put the chat on your website, talking to your live agent.